[ad_1]
So, you recently bought or were gifted an Echo, Echo Dot, or another Echo device, and it’s sitting in your kitchen, silently awaiting your next order. Now what?
Before you can ask your Alexa-powered Echo to play your favorite Spotify playlist or to turn on your living room lights, you’ll need to tweak a few key settings. Get the scoop on how to train Alexa to recognize your voice, keep her from letting just anyone buy stuff on Amazon, tell her where you live and work, and more.
Create a voice profile
As soon as your new Echo is up and running, Alexa can start answering your questions and doing your bidding. That said, it’s a good idea to help Alexa get accustomed to your voice as soon as possible. By creating a voice profile, you can train Alexa to both understand and recognize your voice, which comes in handy when it comes to asking Alexa to shop or send messages to others.
Your Echo device should have prompted you to create a voice profile during the initial setup process, but if you skipped it (as I did the first time), there’s an easy way to go back.
On the Amazon Alexa app for iOS or Android, tap the menu button, tap Settings > Alexa Account > Recognized Voices > Your Voice, and then tap the big blue “Begin” button. Alexa will ask you to say four brief phrases into your Echo. Once that’s done, she’ll have a much better grasp of what you sound like.
Customize your voice-shopping settings
By default, your Echo lets you—or anyone else within earshot—buy items on Amazon simply by asking Alexa. While it’s certainly convenient to just say “Alexa, order laundry detergent,” you might not want your kids casually asking Alexa to buy them the latest Bakugan.
 Ben Patterson/IDG
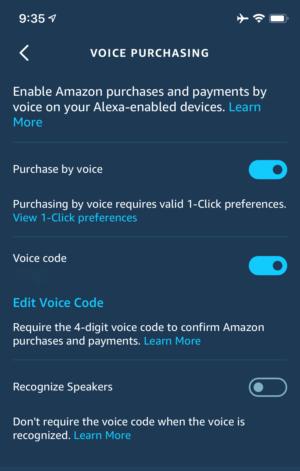
You can keep Alexa from letting anyone buy items on Amazon by setting a four-digit voice code.
Luckily, there’s an easy way to add some safeguards to Alexa’s voice purchasing feature so your rugrats can’t start ordering toys, candy, or whatever pops into their adorably greedy little heads. You can also turn off voice purchasing altogether if you wish.
First, open the Amazon Alexa app on your iPhone or Android phone, tap the menu button, then tap Settings > Alexa Account > Voice Purchasing.
If you’d like to keep the voice purchasing feature, but prevent your kids from using it, you can add a four-digit voice code that you’ll need to say before Alexa agrees to buy anything for you. Just toggle the Voice code setting and then punch in a four-digit code. The next time you or anyone else asks Alexa to buy something, she’ll ask for your voice code before completing the purchase.
The thing about kids, of course, is that in addition to being clever, they also remember everything you say, including voice codes. That’s why you should probably set Alexa to skip the voice code if she recognizes your voice. (That voice profile you created is about to come in handy.)
Simply head back to the Voice Purchasing screen and toggle on the Recognize Speakers setting. Now, you won’t have to say a voice code when asking Alexa to buy things on Amazon—and even better—no one else will overhear your code.
Last, but not least, you can turn off voice purchasing altogether by toggling off the “Purchase by voice” setting.
Set a “do not disturb” schedule
Once you’re more familiar with your new Echo, you may choose to have it announce upcoming calendar items, news headlines, incoming messages, and dozens of other possible events.
 Ben Patterson/IDG
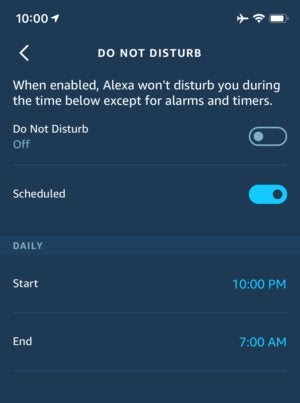
Setting a “do not disturb” schedule for you Echo will help ensure Alexa doesn’t wake you in the middle of the night.
Chances are, however, that you don’t want Alexa jolting you awake at 3 a.m. just because you got some spam in your inbox.
To keep Alexa quiet after you’ve gone to bed, tap the menu button in the Alexa app, and then tap Settings > Device Settings. Tap the name of your new Echo, and then tap Do Not Disturb. Next, tap the Scheduled toggle, and then set the hours when you’d like Alexa to be silent.
Keep in mind that Alexa will ignore your Do Not Disturb settings when it comes to alarms and timers, so plan accordingly.
Pick a music service
One of the most tempting things to try first with your new Echo is to ask it to play some tunes. By default, however, Alexa plays music from Amazon Music. If you subscribe to a different music service, such as Apple Music, Pandora, or Spotify, you can link your music account to your Alexa account, and then set it as your default music service.
Tap the menu button on the Alexa app, tap Settings > Music, and then tap Link New Service. Once you’ve found your favorite music service, tap it to enable an Alexa “skill” for it, and then go ahead and sign in. Finally, tap Default Services from the Music screen, and select a new default setting for your music library and for music stations.
Once that’s done, you can say “Alexa, play some Bruce Springsteen,” and you’ll soon hear The Boss crooning from your favorite music service.
Set your home and work locations
If you want to know how long it’ll take to drive to work on a particular morning, just ask Alexa—that is, once she knows your work address.
 Ben Patterson/IDG
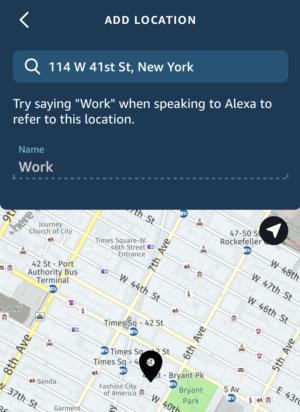
You can show Alexa where you live and work in the Alexa app for iOS and Android.
Tap the menu button in the Alexa app, tap Your Locations, and then tap Add Location to teach Alexa where you live where you work, and any other locations you’d like her to know about.
Add your smart devices
Got any devices you’d like Alexa to control, such as a smart bulb, a thermostat, or a security system? You can start setting them up in a few taps.
First, tap the menu button in the Alexa app, then tap Add Device. You’ll see a list of a wide range of smart devices, from lights and plugs to cameras and microwaves. Pick a category, tap a brand, and then follow the steps to create a new skill for the device or smart service.
Once the skill is set up, you can say things like “Alexa, set the basement temperature to 78 degrees,” or “Alexa, turn off the living-room lights.”
[ad_2]
Source link